K8s 安装
环境初始化1:分别在2台主机设置主机名称hostnamectl set-hostname node1hostnamectl set-hostname node22:配置主机映射cat <<EO
环境初始化
1:分别在2台主机设置主机名称
hostnamectl set-hostname node1hostnamectl set-hostname node2
2:配置主机映射
cat <<EOF >/etc/hosts127.0.0.1 localhost localhost.localdomain localhost4 localhost4.localdomain4::1 localhost localhost.localdomain localhost6 localhost6.localdomain6192.168.124.129 node1192.168.124.132 node2EOF
3:node1上执行ssh免密码登陆配置
ssh-keygen #一路回车即可ssh-copy-id node2
4:两台主机配置、停防火墙、关闭Swap、关闭Selinux
# 禁用防火墙:$ systemctl stop firewalld$ systemctl disable firewalld# 禁用SELINUX:$ setenforce 0$ cat /etc/selinux/configSELINUX=disabled# 创建/etc/sysctl.d/k8s.conf文件,添加如下内容cat <<EOF >/etc/sysctl.d/k8s.confnet.bridge.bridge-nf-call-ip6tables =1net.bridge.bridge-nf-call-iptables =1EOFsysctl --system#关闭系统Swapswapoff -ased -i 's/.*swap.*/#&/'/etc/fstab
镜像准备
如果你的节点上面有科学上网的工具,可以忽略这一步,我们需要提前将所需的http://gcr.io上面的镜像下载到节点上面,当然前提条件是你已经成功安装了docker。
1、master节点,执行下面的命令:
docker pull registry.cn-hangzhou.aliyuncs.com/google_containers/kube-apiserver:v1.12.0docker pull registry.cn-hangzhou.aliyuncs.com/google_containers/kube-controller-manager:v1.12.0docker pull registry.cn-hangzhou.aliyuncs.com/google_containers/kube-proxy:v1.12.0docker pull registry.cn-hangzhou.aliyuncs.com/google_containers/kube-scheduler:v1.12.0docker pull registry.cn-hangzhou.aliyuncs.com/google_containers/etcd:3.2.24docker pull registry.cn-hangzhou.aliyuncs.com/google_containers/coredns:1.2.2docker pull cnych/flannel:v0.10.0-amd64docker pull registry.cn-hangzhou.aliyuncs.com/google_containers/pause:3.1docker pull registry.cn-hangzhou.aliyuncs.com/k8sth/kubernetes-dashboard-amd64:v1.8.3docker pull registry.cn-hangzhou.aliyuncs.com/k8sth/heapster-grafana-amd64:v4.4.3docker pull registry.cn-hangzhou.aliyuncs.com/k8sth/heapster-influxdb-amd64:v1.3.3docker pull registry.cn-hangzhou.aliyuncs.com/k8sth/heapster-amd64:3.1
docker tag registry.cn-hangzhou.aliyuncs.com/google_containers/kube-apiserver:v1.12.0 k8s.gcr.io/kube-apiserver:v1.12.0docker tag registry.cn-hangzhou.aliyuncs.com/google_containers/kube-controller-manager:v1.12.0docker tagregistry.cn-hangzhou.aliyuncs.com/google_containers/kube-proxy:v1.12.0 k8s.gcr.io/kube-proxy:v1.12.0docker tag registry.cn-hangzhou.aliyuncs.com/google_containers/kube-scheduler:v1.12.0docker tag registry.cn-hangzhou.aliyuncs.com/google_containers/pause:3.1 k8s.gcr.io/pause:3.1docker tag registry.cn-hangzhou.aliyuncs.com/google_containers/etcd:3.2.24 k8s.gcr.io/etcd:3.2.24docker tag registry.cn-hangzhou.aliyuncs.com/google_containers/coredns:1.2.2 k8s.gcr.io/coredns:1.2.2docker tag cnych/flannel:v0.10.0-amd64:v0.10.0-amd64 quay.io/coreos/flannel:v0.10.0-amd64
2、slave节点,执行下面的命令:
docker pull registry.cn-hangzhou.aliyuncs.com/google_containers/kube-proxy:v1.12.0docker pull cnych/flannel:v0.10.0-amd64docker pull registry.cn-hangzhou.aliyuncs.com/google_containers/pause:3.1docker tagregistry.cn-hangzhou.aliyuncs.com/google_containers/kube-proxy:v1.12.0 k8s.gcr.io/kube-proxy:v1.12.0docker tag registry.cn-hangzhou.aliyuncs.com/google_containers/pause:3.1 k8s.gcr.io/pause:3.1docker tag cnych/flannel:v0.10.0-amd64:v0.10.0-amd64 quay.io/coreos/flannel:v0.10.0-amd64
安装配置kubernetes
两个节点都需要安装
安装
cat >/etc/yum.repos.d/kubernetes.repo <<EOF[kubernetes]name=Kubernetesbaseurl=https://mirrors.aliyun.com/kubernetes/yum/repos/kubernetes-el7-x86_64enabled=1gpgcheck=0repo_gpgcheck=0EOF
我们是安装最新版本的,所以直接yum install -y kubeadm即可,它会安装相应依赖包。
如果要指定版本,可以先看看有那些版本yum list kubeadm --showduplicates
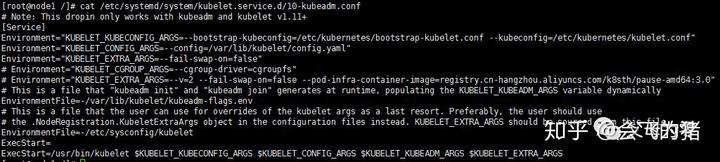
配置 kubelet
修改文件kubelet的配置文件/etc/systemd/system/kubelet.service.d/10-kubeadm.conf, 配置文件中增加一项配置(在ExecStart之前):
Environment="KUBELET_EXTRA_ARGS=--fail-swap-on=false"
如图所示:
# kubelet设置开机自动运行systemctl enable kubelet
启动kubelet:
systemctl start kubelet
集群安装
$ kubeadm init>--kubernetes-version=v1.12.0>--pod-network-cidr=10.244.0.0/16>--apiserver-advertise-address=192.168.124.129>--ignore-preflight-errors=Swap[init]usingKubernetes version: v1.12.0[preflight] running pre-flight checks[WARNING Swap]: running with swap on isnot supported.Please disable swap[WARNING SystemVerification]:thisDocker version isnot on the list of validated versions:17.12.1-ce.Latest validated version:18.06[preflight/images]Pulling images required for setting up a Kubernetes cluster[preflight/images]This might take a minute or two, depending on the speed of your internet connection[preflight/images]You can also perform this action in beforehand using'kubeadm config images pull'[kubelet]Writing kubelet environment file with flags to file "/var/lib/kubelet/kubeadm-flags.env"[kubelet]Writing kubelet configuration to file "/var/lib/kubelet/config.yaml"[preflight]Activating the kubelet service[certificates]Generated etcd/ca certificate and key.[certificates]Generated etcd/server certificate and key.[certificates] etcd/server serving cert issignedfor DNS names [node1 localhost]andIPs[127.0.0.1::1][certificates]Generated etcd/peer certificate and key.[certificates] etcd/peer serving cert issignedfor DNS names [node1 localhost]andIPs[192.168.124.129127.0.0.1::1][certificates]Generated apiserver-etcd-client certificate and key.[certificates]Generated etcd/healthcheck-client certificate and key.[certificates]Generated ca certificate and key.[certificates]Generated apiserver certificate and key.[certificates] apiserver serving cert issignedfor DNS names [node1 kubernetes kubernetes.default kubernetes.default.svc kubernetes.default.svc.cluster.local]andIPs[10.96.0.1192.168.124.129][certificates]Generated apiserver-kubelet-client certificate and key.[certificates]Generated front-proxy-ca certificate and key.[certificates]Generated front-proxy-client certificate and key.[certificates] valid certificates and keys now exist in"/etc/kubernetes/pki"[certificates]Generated sa key andpublic key.[kubeconfig]WroteKubeConfig file to disk:"/etc/kubernetes/admin.conf"[kubeconfig]WroteKubeConfig file to disk:"/etc/kubernetes/kubelet.conf"[kubeconfig]WroteKubeConfig file to disk:"/etc/kubernetes/controller-manager.conf"[kubeconfig]WroteKubeConfig file to disk:"/etc/kubernetes/scheduler.conf"[controlplane] wrote StaticPod manifest for component kube-apiserver to "/etc/kubernetes/manifests/kube-apiserver.yaml"[controlplane] wrote StaticPod manifest for component kube-controller-manager to "/etc/kubernetes/manifests/kube-controller-manager.yaml"[controlplane] wrote StaticPod manifest for component kube-scheduler to "/etc/kubernetes/manifests/kube-scheduler.yaml"[etcd]WroteStaticPod manifest for a local etcd instance to "/etc/kubernetes/manifests/etcd.yaml"[init] waiting for the kubelet to boot up the control plane asStaticPodsfrom directory "/etc/kubernetes/manifests"[init]this might take a minute or longer if the control plane images have to be pulled[apiclient]All control plane components are healthy after 22.507741 seconds[uploadconfig] storing the configuration used inConfigMap"kubeadm-config"in the "kube-system"Namespace[kubelet]Creating a ConfigMap"kubelet-config-1.12"innamespace kube-system with the configuration for the kubelets in the cluster[markmaster]Marking the node node1 as master by adding the label "node-role.kubernetes.io/master=''"[markmaster]Marking the node node1 as master by adding the taints [node-role.kubernetes.io/master:NoSchedule][patchnode]Uploading the CRI Socket information "/var/run/dockershim.sock" to the Node API object"node1"as an annotation[bootstraptoken]using token: momf47.0scodcv3cm6t75vm[bootstraptoken] configured RBAC rules to allow NodeBootstrap tokens to post CSRsin order for nodes to getlong term certificate credentials[bootstraptoken] configured RBAC rules to allow the csrapprover controller automatically approve CSRsfrom a NodeBootstrapToken[bootstraptoken] configured RBAC rules to allow certificate rotation for all node client certificates in the cluster[bootstraptoken] creating the "cluster-info"ConfigMapin the "kube-public"namespace[addons]Applied essential addon:CoreDNS[addons]Applied essential addon: kube-proxyYourKubernetes master has initialized successfully!To start using your cluster, you need to run the following as a regular user:mkdir -p $HOME/.kubesudo cp -i /etc/kubernetes/admin.conf $HOME/.kube/configsudo chown $(id -u):$(id -g) $HOME/.kube/configYou should now deploy a pod network to the cluster.Run"kubectl apply -f [podnetwork].yaml"with one of the options listed at:https://kubernetes.io/docs/concepts/cluster-administration/addons/You can now join any number of machines by running the following on each nodeas root:kubeadm join 192.168.124.129:6443--token momf47.0scodcv3cm6t75vm--discovery-token-ca-cert-hash sha256:cfeed429d671eeb39b8980ada10b55e79057cc65e108660ef86ae5043d6275f8
初始化主要过程为:
- 1.kubeadm 执行初始化前的检查
- 2.生成 token 和证书
- 3.生成 KubeConfig 文件,kubelet 需要这个文件与 Master 通信。
- 4.安装 Master 组件,会从 goolge 的 Registry 下载组件的 Docker 镜像,这一步可能会花一些时间,主要取决于网络质量,如果本地已有相关镜像则会优先使用本地的。
- 5.安装附加组件 kube-proxy 和 kube-dns
- 6.Kubernetes Master 初始化成功
- 7.提示后续操作
初始化失败后处理办法
kubeadm reset
node1上面执行如下命令
mkdir -p $HOME/.kubesudo cp -i /etc/kubernetes/admin.conf $HOME/.kube/configsudo chown $(id -u):$(id -g) $HOME/.kube/config
kubeadm生成证书密码文件分发到node2上面去
scp -r /etc/kubernetes/pki node03:/etc/kubernetes/
部署flannel网络,只需要在node1执行就行
$ wget https://raw.githubusercontent.com/coreos/flannel/master/Documentation/kube-flannel.yml$ kubectl apply -f kube-flannel.yml
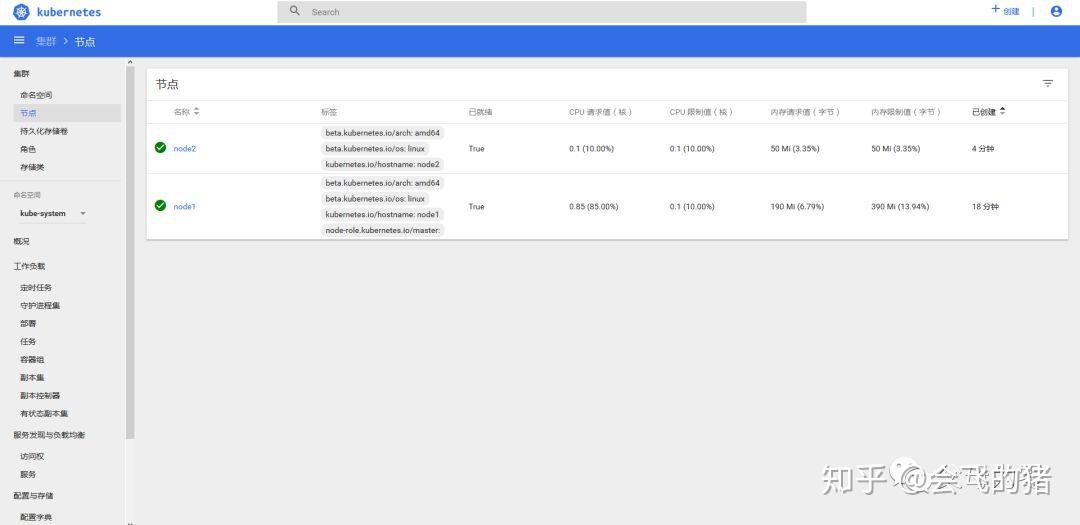
$ kubectl get nodeNAME STATUS ROLES AGE VERSIONnode1 Ready master 5m32s v1.12.2
安装完成后使用kubectl get pods命令可以查看到我们集群中的组件运行状态,如果都是Running状态的话,那么恭喜你,你的master节点安装成功了。
kubectl get pods --all-namespacesNAMESPACE NAME READY STATUS RESTARTS AGEkube-system coredns-576cbf47c7-mntdb 1/1Running05m20skube-system coredns-576cbf47c7-rswvv 1/1Running05m20skube-system etcd-node1 1/1Running04m33skube-system kube-apiserver-node1 1/1Running04m44skube-system kube-controller-manager-node1 1/1Running04m28skube-system kube-flannel-ds-amd64-gxqq8 1/1Running024skube-system kube-proxy-4xgvb1/1Running05m20skube-system kube-scheduler-node1 1/1Running04m38s
部署Dashboard插件
kubernetes-dashboard.yaml文件内容如下:
# Copyright 2017 The Kubernetes Authors.## Licensed under the Apache License, Version 2.0 (the "License");# you may not use this file except in compliance with the License.# You may obtain a copy of the License at## http://www.apache.org/licenses/LICENSE-2.0## Unless required by applicable law or agreed to in writing, software# distributed under the License is distributed on an "AS IS" BASIS,# WITHOUT WARRANTIES OR CONDITIONS OF ANY KIND, either express or implied.# See the License for the specific language governing permissions and# limitations under the License.# Configuration to deploy release version of the Dashboard UI compatible with# Kubernetes 1.8.## Example usage: kubectl create -f <this_file># ------------------- Dashboard Secret ------------------- #apiVersion: v1kind:Secretmetadata:labels:k8s-app: kubernetes-dashboardname: kubernetes-dashboard-certsnamespace: kube-systemtype:Opaque---# ------------------- Dashboard Service Account ------------------- #apiVersion: v1kind:ServiceAccountmetadata:labels:k8s-app: kubernetes-dashboardname: kubernetes-dashboardnamespace: kube-system---# ------------------- Dashboard Role & Role Binding ------------------- #kind:RoleapiVersion: rbac.authorization.k8s.io/v1metadata:name: kubernetes-dashboard-minimalnamespace: kube-systemrules:# Allow Dashboard to create 'kubernetes-dashboard-key-holder' secret.- apiGroups:[""]resources:["secrets"]verbs:["create"]# Allow Dashboard to create 'kubernetes-dashboard-settings' config map.- apiGroups:[""]resources:["configmaps"]verbs:["create"]# Allow Dashboard to get, update and delete Dashboard exclusive secrets.- apiGroups:[""]resources:["secrets"]resourceNames:["kubernetes-dashboard-key-holder","kubernetes-dashboard-certs"]verbs:["get","update","delete"]# Allow Dashboard to get and update 'kubernetes-dashboard-settings' config map.- apiGroups:[""]resources:["configmaps"]resourceNames:["kubernetes-dashboard-settings"]verbs:["get","update"]# Allow Dashboard to get metrics from heapster.- apiGroups:[""]resources:["services"]resourceNames:["heapster"]verbs:["proxy"]- apiGroups:[""]resources:["services/proxy"]resourceNames:["heapster","http:heapster:","https:heapster:"]verbs:["get"]---apiVersion: rbac.authorization.k8s.io/v1kind:RoleBindingmetadata:name: kubernetes-dashboard-minimalnamespace: kube-systemroleRef:apiGroup: rbac.authorization.k8s.iokind:Rolename: kubernetes-dashboard-minimalsubjects:- kind:ServiceAccountname: kubernetes-dashboardnamespace: kube-system---# ------------------- Dashboard Deployment ------------------- #kind:DeploymentapiVersion: apps/v1beta2metadata:labels:k8s-app: kubernetes-dashboardname: kubernetes-dashboardnamespace: kube-systemspec:replicas:1revisionHistoryLimit:10selector:matchLabels:k8s-app: kubernetes-dashboardtemplate:metadata:labels:k8s-app: kubernetes-dashboardspec:nodeSelector:node-role.kubernetes.io/master:""containers:- name: kubernetes-dashboardimage: registry.cn-hangzhou.aliyuncs.com/k8sth/kubernetes-dashboard-amd64:v1.8.3ports:- containerPort:8443protocol: TCPargs:---auto-generate-certificates# Uncomment the following line to manually specify Kubernetes API server Host# If not specified, Dashboard will attempt to auto discover the API server and connect# to it. Uncomment only if the default does not work.# - --apiserver-host=http://my-address:portvolumeMounts:- name: kubernetes-dashboard-certsmountPath:/certs# Create on-disk volume to store exec logs- mountPath:/tmpname: tmp-volumelivenessProbe:httpGet:scheme: HTTPSpath:/port:8443initialDelaySeconds:30timeoutSeconds:30volumes:- name: kubernetes-dashboard-certssecret:secretName: kubernetes-dashboard-certs- name: tmp-volumeemptyDir:{}serviceAccountName: kubernetes-dashboard# Comment the following tolerations if Dashboard must not be deployed on mastertolerations:- key: node-role.kubernetes.io/mastereffect:NoSchedule---# ------------------- Dashboard Service ------------------- #kind:ServiceapiVersion: v1metadata:labels:k8s-app: kubernetes-dashboardname: kubernetes-dashboardnamespace: kube-systemspec:type:NodePortports:- port:443targetPort:8443nodePort:30000selector:k8s-app: kubernetes-dashboard---apiVersion: v1kind:ServiceAccountmetadata:name: admin-usernamespace: kube-system---apiVersion: rbac.authorization.k8s.io/v1beta1kind:ClusterRoleBindingmetadata:name: admin-userroleRef:apiGroup: rbac.authorization.k8s.iokind:ClusterRolename: cluster-adminsubjects:- kind:ServiceAccountname: admin-usernamespace: kube-system
执行如下文件
kubectl create -f kubernetes-dashboard.yaml
获取token,通过令牌登陆
$ kubectl -n kube-system describe secret $(kubectl -n kube-system get secret | grep admin-user | awk '{print $1}')Name: admin-user-token-z6lhqNamespace: kube-systemLabels:<none>Annotations: kubernetes.io/service-account.name: admin-userkubernetes.io/service-account.uid:1b1a9541-ed6d-11e8-8458-000c2960d34dType: kubernetes.io/service-account-tokenData====ca.crt:1025 bytesnamespace:11 bytestoken: eyJhbGciOiJSUzI1NiIsImtpZCI6IiJ9.eyJpc3MiOiJrdWJlcm5ldGVzL3NlcnZpY2VhY2NvdW50Iiwia3ViZXJuZXRlcy5pby9zZXJ2aWNlYWNjb3VudC9uYW1lc3BhY2UiOiJrdWJlLXN5c3RlbSIsImt1YmVybmV0ZXMuaW8vc2VydmljZWFjY291bnQvc2VjcmV0Lm5hbWUiOiJhZG1pbi11c2VyLXRva2VuLXo2bGhxIiwia3ViZXJuZXRlcy5pby9zZXJ2aWNlYWNjb3VudC9zZXJ2aWNlLWFjY291bnQubmFtZSI6ImFkbWluLXVzZXIiLCJrdWJlcm5ldGVzLmlvL3NlcnZpY2VhY2NvdW50L3NlcnZpY2UtYWNjb3VudC51aWQiOiIxYjFhOTU0MS1lZDZkLTExZTgtODQ1OC0wMDBjMjk2MGQzNGQiLCJzdWIiOiJzeXN0ZW06c2VydmljZWFjY291bnQ6a3ViZS1zeXN0ZW06YWRtaW4tdXNlciJ9.sdAwrS-tLEHY62ufIwZBrC58-yVsqMGV_AdeyFu8EBPpzdSfgCDemPIyEonGdz9cU6CLMpLnvJ4r7OLBexCaZ4WPIh_Q6N3YjK150d--3uzxQVxtoezVrrgBUCAUgC1KNewa0Suu32A-c-tPj2ykxSGpIYVDDQDQKqw_2E91diF-WKD9YMTl2H9sQU6N9RvSW7t0kQKcBFe8mDTUl4jrT-LnaISL_Qxcn0gwTlU-cbTBYuTpKvyLJ-aa6DfmFebQWA_Je-CLwh6ayk1X6DVVaSE_H5S9atGvnLQ1QVuj3ukHRtKnNSzAGM-boBaGTWZ0Khxo3sbsi7kvUZArYV1Vow
通过firefox访问dashboard,输入token,即可登陆
https://192.168.124.129:30000/#!/login
安装heapster
$ kubectl create -f kube-heapster/influxdb/$ kubectl create -f kube-heapster/rbac/
heapster文件信息:
[root@node01 ~]# tree kube-heapster/kube-heapster/├── influxdb│├── grafana.yaml│├── heapster.yaml│└── influxdb.yaml└── rbac└── heapster-rbac.yaml
grafana.yaml
apiVersion: extensions/v1beta1kind:Deploymentmetadata:name: monitoring-grafananamespace: kube-systemspec:replicas:1template:metadata:labels:task: monitoringk8s-app: grafanaspec:nodeSelector:node-role.kubernetes.io/master:""containers:- name: grafanaimage: registry.cn-hangzhou.aliyuncs.com/k8sth/heapster-grafana-amd64:v4.4.3imagePullPolicy:IfNotPresentports:- containerPort:3000protocol: TCPvolumeMounts:- mountPath:/etc/ssl/certsname: ca-certificatesreadOnly:true- mountPath:/varname: grafana-storageenv:- name: INFLUXDB_HOSTvalue: monitoring-influxdb- name: GF_SERVER_HTTP_PORTvalue:"3000"# The following env variables are required to make Grafana accessible via# the kubernetes api-server proxy. On production clusters, we recommend# removing these env variables, setup auth for grafana, and expose the grafana# service using a LoadBalancer or a public IP.- name: GF_AUTH_BASIC_ENABLEDvalue:"false"- name: GF_AUTH_ANONYMOUS_ENABLEDvalue:"true"- name: GF_AUTH_ANONYMOUS_ORG_ROLEvalue:Admin- name: GF_SERVER_ROOT_URL# If you're only using the API Server proxy, set this value instead:# value: /api/v1/namespaces/kube-system/services/monitoring-grafana/proxyvalue:/volumes:- name: ca-certificateshostPath:path:/etc/ssl/certs- name: grafana-storageemptyDir:{}---apiVersion: v1kind:Servicemetadata:labels:# For use as a Cluster add-on (https://github.com/kubernetes/kubernetes/tree/master/cluster/addons)# If you are NOT using this as an addon, you should comment out this line.kubernetes.io/cluster-service:'true'kubernetes.io/name: monitoring-grafananame: monitoring-grafananamespace: kube-systemspec:# In a production setup, we recommend accessing Grafana through an external Loadbalancer# or through a public IP.# type: LoadBalancer# You could also use NodePort to expose the service at a randomly-generated port# type: NodePortports:- port:80targetPort:3000selector:k8s-app: grafana
heapster.yaml
apiVersion: v1kind:ServiceAccountmetadata:name: heapsternamespace: kube-system---apiVersion: extensions/v1beta1kind:Deploymentmetadata:name: heapsternamespace: kube-systemspec:replicas:1template:metadata:labels:task: monitoringk8s-app: heapsterspec:serviceAccountName: heapsternodeSelector:node-role.kubernetes.io/master:""containers:- name: heapsterimage: registry.cn-hangzhou.aliyuncs.com/k8sth/heapster-amd64:v1.4.2imagePullPolicy:IfNotPresentcommand:-/heapster---source=kubernetes:https://kubernetes.default---sink=influxdb:http://monitoring-influxdb.kube-system.svc:8086---apiVersion: v1kind:Servicemetadata:labels:task: monitoring# For use as a Cluster add-on (https://github.com/kubernetes/kubernetes/tree/master/cluster/addons)# If you are NOT using this as an addon, you should comment out this line.kubernetes.io/cluster-service:'true'kubernetes.io/name:Heapstername: heapsternamespace: kube-systemspec:ports:- port:80targetPort:8082selector:k8s-app: heapster
influxdb.yaml
apiVersion: extensions/v1beta1kind:Deploymentmetadata:name: monitoring-influxdbnamespace: kube-systemspec:replicas:1template:metadata:labels:task: monitoringk8s-app: influxdbspec:nodeSelector:node-role.kubernetes.io/master:""containers:- name: influxdbimage: registry.cn-hangzhou.aliyuncs.com/k8sth/heapster-influxdb-amd64:v1.3.3imagePullPolicy:IfNotPresentvolumeMounts:- mountPath:/dataname: influxdb-storagevolumes:- name: influxdb-storageemptyDir:{}---apiVersion: v1kind:Servicemetadata:labels:task: monitoring# For use as a Cluster add-on (https://github.com/kubernetes/kubernetes/tree/master/cluster/addons)# If you are NOT using this as an addon, you should comment out this line.kubernetes.io/cluster-service:'true'kubernetes.io/name: monitoring-influxdbname: monitoring-influxdbnamespace: kube-systemspec:ports:- port:8086targetPort:8086selector:k8s-app: influxdb
heapster-rbac.yaml
kind:ClusterRoleBindingapiVersion: rbac.authorization.k8s.io/v1beta1metadata:name: heapsterroleRef:apiGroup: rbac.authorization.k8s.iokind:ClusterRolename: system:heapstersubjects:- kind:ServiceAccountname: heapsternamespace: kube-system
让master也运行pod(默认master不运行pod)
kubectl taint nodes --all node-role.kubernetes.io/master-
添加node2节点到集群
在node2节点执行如下命令,即可将节点添加进集群
kubeadm join 192.168.124.129:6443--token momf47.0scodcv3cm6t75vm--discovery-token-ca-cert-hash sha256:cfeed429d671eeb39b8980ada10b55e79057cc65e108660ef86ae5043d6275f8 --ignore-preflight-errors=Swap[preflight] running pre-flight checks[WARNING RequiredIPVSKernelModulesAvailable]: the IPVS proxier will not be used, because the following required kernel modules are not loaded:[ip_vs ip_vs_rr ip_vs_wrr ip_vs_sh]orno builtin kernel ipvs support: map[ip_vs:{} ip_vs_rr:{} ip_vs_wrr:{} ip_vs_sh:{} nf_conntrack_ipv4:{}]you can solve this problem with following methods:1.Run'modprobe -- ' to load missing kernel modules;2.Provide the missing builtin kernel ipvs support[WARNING SystemVerification]:thisDocker version isnot on the list of validated versions:17.12.1-ce.Latest validated version:18.06[discovery]Trying to connect to API Server"192.168.124.129:6443"[discovery]Created cluster-info discovery client, requesting info from"https://192.168.124.129:6443"[discovery]Requesting info from"https://192.168.124.129:6443" again to validate TLS against the pinned public key[discovery]Cluster info signature and contents are valid and TLS certificate validates against pinned roots, will use API Server"192.168.124.129:6443"[discovery]Successfully established connection with API Server"192.168.124.129:6443"[kubelet]Downloading configuration for the kubelet from the "kubelet-config-1.12"ConfigMapin the kube-system namespace[kubelet]Writing kubelet configuration to file "/var/lib/kubelet/config.yaml"[kubelet]Writing kubelet environment file with flags to file "/var/lib/kubelet/kubeadm-flags.env"[preflight]Activating the kubelet service[tlsbootstrap]Waitingfor the kubelet to perform the TLS Bootstrap...[patchnode]Uploading the CRI Socket information "/var/run/dockershim.sock" to the Node API object"node2"as an annotationThis node has joined the cluster:*Certificate signing request was sent to apiserver and a response was received.*TheKubelet was informed of the new secure connection details.Run'kubectl get nodes' on the master to see this node join the cluster.
$ kubectl get nodeNAME STATUS ROLES AGE VERSIONnode1 Ready master 78m v1.12.2node2 Ready<none>64m v1.12.2
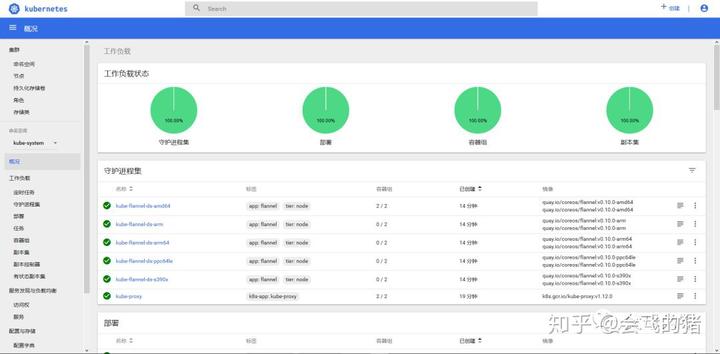
$ kubectl get pods --all-namespacesNAMESPACE NAME READY STATUS RESTARTS AGEkube-system coredns-576cbf47c7-mntdb 1/1Running020mkube-system coredns-576cbf47c7-rswvv 1/1Running020mkube-system etcd-node1 1/1Running019mkube-system heapster-6955774cc5-gt4c8 1/1Running013mkube-system kube-apiserver-node1 1/1Running020mkube-system kube-controller-manager-node1 1/1Running019mkube-system kube-flannel-ds-amd64-2qzpw1/1Running06m55skube-system kube-flannel-ds-amd64-gxqq8 1/1Running015mkube-system kube-proxy-4xgvb1/1Running020mkube-system kube-proxy-xhvfn 1/1Running06m55skube-system kube-scheduler-node1 1/1Running020mkube-system kubernetes-dashboard-55f88765fb-qvm9w 1/1Running015mkube-system monitoring-grafana-9658ddc99-k8np4 1/1Running013mkube-system monitoring-influxdb-96bf68f65-9mn861/1Running013m
访问dashboard